Here’s some background about my current project, feel free to skip straight to the tips section below.
As of recently I’ve been hired as an undergrad research assistant at UTK. I’m developing a reimplementation of PatchWorks by Austin Henley (who I’m working for).
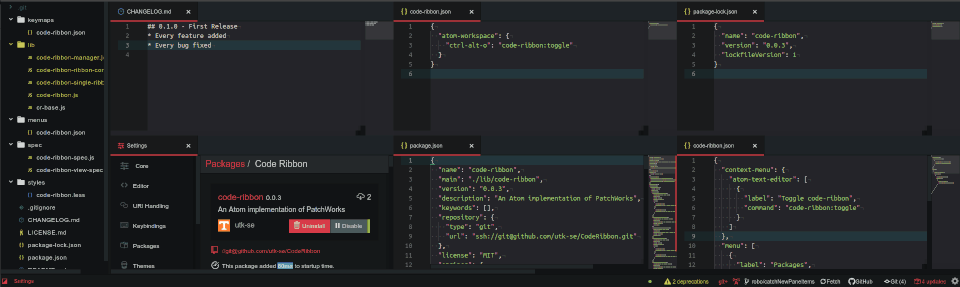
The new project is now named CodeRibbon, since we’re essentially starting from a clean slate in terms of codebase, and we’re rethinking a few human interaction factors.
For the reimplementation we wanted something that can be used in the real world, since the plan is to make CodeRibbon open source and easy to install & use.
In the end we chose to make it an Atom plugin because of how easily and rapidly we can prototype and design a full IDE experience. It’s not called “the most hackable editor” for nothing.
So here are some useful tips I’ve learned while working on Atom plugins.
Serialization
Serialization in Atom is amazingly useful, however it’s extremely hard to grasp for most newcomers.
In essence, we serialize because we want to retain a state between sessions, but it can also be used to store inactive components when they can be unloaded to lighten the DOM.
For CodeRibbon, we use serialization to store the layout and configuration of the Ribbons and Patches, so that when the user opens Atom again, they can get back to work where they left off.
When developing a plugin that uses serialization for the first time, you’re almost always going to run into a case where the serialized state is incorrect or unusable. In these cases, you’ll want to know these tricks:
Clear Atom’s saved serialized states
Starting Atom with an argument --clear-window-state will delete all serialized states from Atom’s serialized store.
atom --clear-window-state
However if you’re using Atom to develop the plugin at the same time, you often would like to keep your other project’s window states, so in this case we would like to separate Atom’s Dev mode tests from our normal work.
Using a separate devmode directory
Atom respects an environment variable named ATOM_HOME which defaults to ~/.atom.
You can run Atom with this var set to change it’s dir, but that has many disadvantages:
ATOM_HOME="~/.atom-devmode" atom -d
However this is essentially making a second install of Atom and none of your packages or settings will be copied over or shared. For some cases this is useful, but for me I prefer to have all my non-devmode packages loaded in both. Using firejail, we can do a lot better:
Sandboxing for dev mode (firejail)
NOTE! I’ve written more on this in an update section below, you should read that instead!
Using firejail, we can either save our Devmode Atom states in a filesystem overlay, or we can run Atom in a way where changes it makes are not saved to disk at all. (Run it in a tmpfs overlay!)
To run Atom in dev mode while saving the changes to a separate location on disk:
firejail --noprofile --overlay-named=WHATEVER_NAME_YOU_WANT atom -d .
This will save any writes Atom makes to disk to an overlay fs that’s saved in your home dir under ~/.firejail/WHATEVER_NAME_YOU_WANT. You can clear that just by rming that folder.
When you start Atom again, if a file is in the overlay, it will be used instead of the real file on your disk. This allows you to have essentially two versions of your Atom data without conflicting between normal and dev mode.
If you don’t care about saving the state or changes made by Atom in dev mode, run it with a tmpfs overlay instead and all changes will be lost when you exit:
firejail --noprofile --overlay-tmpfs atom -d .
No input to Atom with firejail
If for some reason you don’t get input (no keypresses being sent) to Atom, try running firejail with this envvar set: GTK_IM_MODULE=xim
GTK_IM_MODULE=xim firejail --noprofile --overlay-tmpfs atom -d
Getting access to Atom internals
Although Atom is branded as ‘hackable’ that doesn’t mean it’s easy.
If you want to do things like extend native classes and use Atom’s internal code as a base to write new things, it’s not completely straightforward. In fact, it’s very much a hack!
For example in CodeRibbon we wanted to create a new type of Pane known as a Patch. (PatchWorks…)
This involved creating a class that extended from Atom’s native Pane type so that we can maintain compatibility with all the existing Atom plugins.
But Atom doesn’t make the Pane class accessible, so how we get access to it? (And other internal types as well, including PaneContainer, PaneAxis, etc)
Well, it’s a hack:
var atom_PaneContainer = atom.workspace.getCenter().paneContainer.__proto__.constructor;
Whew, wasn’t too hard, right? As you can see, we can essentially ‘clone’ javascript classes using their prototype and their constructor combination.
Well what happens when there isn’t an object to steal the constructor from? In this case, opening Atom to a blank new workspace leaves us without any PaneAxis since there’s only one pane…
In this case, we need to make calls to force Atom to create one of these classes out of necessity somewhere that we can find it.
The solution for PaneAxis: split the Pane, steal the PaneAxis that was created by splitting, then cleanup/destroy the Pane we created.
var atom_PaneAxis = atom.workspace.getCenter().paneContainer.root.__proto__.constructor;
debug.log("CR: Took PaneAxis as:", atom_PaneAxis);

/**
 * HACK: force atom to generate a PaneAxis for us to steal the prototype from
 * (because I can't find any other access to it from outside Atom Core)
 */
if (atom_PaneAxis.name != "PaneAxis") {
  debug.warn("Attempting recovery of PaneAxis prototype!");
  // force atom to use at least one PaneAxis
  var p = atom.workspace.getCenter().paneContainer.activePane.splitDown();
  // try to capture it
  atom_PaneAxis = atom.workspace.getCenter().paneContainer.root.__proto__.constructor;
  // clean up
  debug.warn("Attempt at PaneAxis recovery returned:", atom_PaneAxis);
  p.destroy();
}
Debug logging
In almost all cases, you want to be able to print information as your program comes across it during execution. Most people would jump straight on console.log, but that will end up biting you later on when you go to publish that plugin to non-devmode Atom installs.
Instead of using console.log, I recommend creating a dev-specific copy of the logging core:
const force_atom_devMode = false; // set true to debug in non-devmode

var Debugger = function(prefixStr) {
  this.debug = {};
  if (atom.devMode || force_atom_devMode) {
    for (var m in console)
      if (typeof console[m] == 'function') // eslint-disable-line no-console
        this.debug[m] = console[m].bind(window.console, prefixStr); // eslint-disable-line no-console
  }
  else {
    for (var m in console) // eslint-disable-line no-redeclare
      if (typeof console[m] == 'function') // eslint-disable-line no-console
        this.debug[m] = function(){};
  }
  return this.debug;
}

var debug = Debugger("My Plugin:");
Feel free to copy-paste this code. The "My Plugin:" text is prepended to every logging call you use this for, and it works just the same as console.log!
Example:
var debug = Debugger("CR:");

// in an Atom Pane:
this.onDidAddItem(thing => {
  crdebug("Patch got new item: ", thing);
});
Outputs:
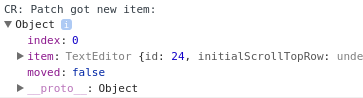
It essentially creates a logger that’s only active when Atom is in devmode, so that you don’t have to worry about removing the debugging statements when you publish the plugin.
Sandboxing with Firejail
Update from May 2019
Using firejail to do testing and development has become an integral part of my workflow, to the point where only my primary editor is running outside a jail.
I’ve had some slight issues running Atom in the sandbox, so I’ve made a few changes to the profile that firejail provides for Atom.
It’s not designed to protect you from any security vulnerabilities, it’s just barebones enough to separate changes and prevent the Atom instances from joining / communicating.
The profile I’m using is located in my configs repo.
If you’re really worried about the security of the plugins I wouldn’t use that profile, since it still allows read access to almost the entire home directory.
I’ve also added a script that sets the GTK_IM_MODULE variable properly for me, but that’s about it.
The commands I’ve been running the most are now:
GTK_IM_MODULE=xim firejail --overlay-tmpfs atom -d .
which runs Atom in a temporary filesystem overlay, so you’ll still have all your plugins and whatnot installed.
For a clean Atom install (a completely fresh home directory) I use
GTK_IM_MODULE=xim firejail --private atom -d .
This allows me to check that a plugin will work on a fresh install, since my own Atom setup is already quite loaded with far too many plugins and config changes.
Atom 1.47.0 and Electron Sandboxing
Some new version of Atom introduced the chrome/electron sandboxing SUID binary, so my new firejail commands include --no-sandbox passed to atom.
GTK_IM_MODULE=xim firejail --name=atomdev --overlay-tmpfs atom --no-sandbox -d .
And of course for starting a cleanroom Atom instance:
GTK_IM_MODULE=xim firejail --profile=$HOME/code/configs/firejail/atom.profile --name=atomdev --private sh -c 'apm install code-ribbon && atom --no-sandbox -d .'